We are proud to say that we are the only manufacturer that offers a wide selection of motors, drives, engines, performance components and gear sets.
In order to get the best forward motion from your engine, whether stock or modified, light or heavy boat, sea level or high altitude you need the correct gear ratio.
Here is the recommended gear set for our short tail models:
14 and 18 Vanguard - 28 to 32 tooth top sprocket and 50 tooth bottom sprocket. (1:1.471 gear ratio) These models have low power and are sensitive to loads. So we gear them according to customer need.
23 Vanguard - 34 tooth top clutch/sprocket and 50 tooth bottom sprocket. (1:1.471 gear ratio) On some models we put a 52 tooth on the bottom for more low end power.
27 Kohler, 29 & 31 Vanguard - 36 top and 50 bottom (1:1.389 ratio)
On some models we put a 52 tooth on the bottom or 34 tooth on top for more low end power.
35 Vanguard - 38 top and 50 bottom (1:1.316 ratio)
HD 4000 - 38 top and 49 bottom (1:1.289 ratio)
HD 4400 - 38 top and 49 bottom (1:1.289 ratio)
HD 45 Mag - 38 top and 48 bottom (1:1.263 ratio)
HD 5000 - 38 top and 48 bottom (1:1.263 ratio)
HD 6000 - 38 top and 46 bottom (1:1.210 ratio)
HD 7000 - 40 top and 46 bottom (1:1.15 ratio)
Black death 4500 - 38 top 48 bottom (1:1.263)
Black death 5500 - 38 top 46 bottom (1:1.210)
If you hit the rev limiter, go to the 40 top.
Comments: If the customer has a large load, we would decrease the top sprocket by two teeth or add two teeth to the lower sprocket. This causes the engine to spin faster/prop to spin slower for more bottom end power. When the motor is new, it is easy/no expense to change the top sprocket/clutch ratio. Afterwards it is easier and less expensive to just change the lower sprocket size.
Performance Engines: When a customer adds power to his engine we use the above chart to change the gear ratio. Small 100 to 150 rpm changes can be made with one tooth changes such as our 47 and 49 tooth sprockets. Only a few of us use these.
Load: When a customer changes boat and/or increases load we make small adjustments by increasing the size of the lower sprocket by two teeth. Example, increase from 50 to 52 teeth will add 100 to 150 rpm. This can be done on all models except the mini 23 and 27 because the largest lower sprocket that will fit in the outdrive is 50 tooth.
All our lower sprockets are aluminum with an anodized hardened finish. They are interchangeable between Hyper, Sport, Hunter, Lite and Mini models by use of a mounting bushing. Specify when ordering the Hyper busing which has (7/8" drive) or the Sport/Hunter/Lite (25MM) drive shaft size. The cost of replacement sprockets is about $85 plus shipping.
Most engines are equipped with a 20 amp charging system that charges after 2200 RPMs. Our engines are also fitted with a rectifier that converts AC to DC and controls battery charging.
We recommend a group 24 automotive starting battery. Group 27 is okay. Deep cycle batteries can be used, but are not as good in the long run.
You can run two batteries, one deep cycle and one starter, but remember, use an isolator or battery selection switch if you are using the deep cycle battery to run a trolling motor. The isolator allows one battery to be discharged separately from the other and still allows both to charge from a single source. .
Storage - Remove the battery and place indoor on a piece of wood or rubber for the winter. Fill with distilled (not tap water) if needed. I like to put a trickle charger (1.5 regulated amp) on the battery when in storage.
If you are running our twin 130 watt spotlight kit, turn the lights off immediately when you reach your destination. The engine will not charge while idling so leaving the engine and lights on while putting out decoys can be an issue. The spotlights are great, but will draw down a group 24 battery in 15 minutes.
High RPM/Governor Adjust Tips:
The most common question I get concerns throttle and gov adjustment.
The question really is, can I make my mud motor go faster.
Chances are, you probably can.
First, with the boat out of the water, and the engine turned off, tie, tape or hold down the throttle lever.
1. Loosen the throttle cable clamp located by the muffler. Pull gently until the throttle lever hits its stop. Tighten the cable clamp snug. Do not over tighten.
Start the engine, stock motors should idle under 1200 rpm. The CDI motor, twin and single Mikuni carbs run best at idle from 900 to 1000 rpm.
Run the engine at full throttle. Be careful if you do not have a clutch. The stock engine should run at 4000 to 4100 rpm. Mod motors with carb kits will run against the rev limiter depending on the kit RPM. The HD 45 can run near 4600 out of the water. The new CDI motor will run from 4250 to 4300 rpm.
The best way to get the engine to run smoothly at full rpm is to ease the throttle up to wide open to prevent gov surging.
If the engine does not run at our suggested full rpm adjust the governor.
Tip: Use these governor spring adjustment tips. Do not wire tie or hamper full movement of the spring to get more RPM.
Here goes. The governor is connected directly to the butterfly lever on the carburetor. The throttle you use is connected to the governor by a arm or slide through a governor spring. The governor isn't magic however, without adequate pull by the throttle through the gov spring, its objective, to slow down the engine can limit your max RPMs.
So, we want to exert more pull on the gov spring than the governor, thus controlling top speed RPM out of the water.
The governor either has an adjustment screw or a tab. Either are used to provide gov adjustment by placing more force on the gov arm through the spring. Small block Vans have a tab, large block Vans have a throttle slide spring tension screw, Kohler and Kawi, have a screw also. So adjust the screw or tab to pull further or harder on the governor spring. Each time, incrementally. Check the RPM, each time doing so more carefully to ensure you don't over adjust and cause over-revving problems.
The most common governor adjustment is on the 35 Van. The spring screw is located on the throttle slide directly behind where the throttle lever wire connects to the engine throttle slide. Here is a quick adjustment tip. First set the throttle per para 1 above. With the engine running at idle, screw in the throttle slide spring screw until the rpm begins to rise. Then back off the screw three full turns. Now squeeze the throttle slowly and the engine should run max speed up to the gov spring limit of about 4100 to 4200 rpm. On the HD 45, this is around 4600 RPM.
Keep in mind that under load, depending on the boat, boat load and altitude, your boat will run at a lower RPM in the water.
Caution: Do not adjust stock motors above 4300 RPM in that the engine will float the valves and this can lead to dropping a valve in the cylinder, bent valve stem, etc.
More: The governor spring on your mud motor is designed to exert a set amount of pull on the governor. Most springs are color coded reflecting what RPM they allow the engine to achieve. You can get a new spring if one is old and stretched, or replace it with a color code that is stiffer for more RPM. Our HD 45 has our custom 4600 RPM spring. Stock motors have a 4000 RPM spring.
Governor Spring Arm: The governor spring on most motors is connected to the governor arm or throttle arm. There is normally more than one hole to connect the governor spring. When we can't get an engine to the desired RPM, we move the spring out further on the arm to another hole, thus providing more leverage.
Governor and in-water performance. The governor when properly adjusted has nothing to do with how fast the motor runs in the water. When adjusted properly, you will run your fastest, but not the same as out of the water RPM.
When all this is done, your engine will run its best. Other things can be done to make your boat run faster. These include having the best boat you can afford, load distribution, new propeller, proper gearing for engine and load, and keeping your engine in top running condition - spark plugs, good fuel and routine drive service.
Tip: While you are adjusting the throttle cable in step one, add a fingertip of grease to the cable near the cable sleeve, and tie the cable up on any part of the motor so it is higher than cable end. This will keep water out of your throttle cable and prevent freezing.
On a hot day after I run the engine for a while then shut down, the engine won't restart or it starts and idles fine, but when the throttle is advanced the engine bogs down or quits running and will not restart. Why?
It sounds like your engine may be vapor locking. One factor that contributes to vapor lock is fuel. Fuels produced for use during the winter and early spring months around the United States are designed to vaporize at a lower temperature. This lower vaporization point can cause the fuel in the boat supply lines and engine fuel system to vaporize prior to being used.
Another contributing factor to vapor lock is over-heating. Make sure debris is not blocking the engine air intake and the air filter is clean.
Tips:
- Use synthetic oil. It reduces friction and allows the engine to run cooler.
- Let the engine idle for 3-5 minutes before shutting it off.
- Lighten the load. On larger boats, change the gear ratio so the engine runs at lease 3850 rpm or higher at full throttle.
Remove the valve cover.
Remove the spark plug, put finger on plug hole and turn over the engine until you feel the compression stroke air pressure.
Our large block Vanguard engines come with a Champion RC12YC spark plug.
Although the gap can vary from .030 to .040 on new motors, they should be at .035.
We have found that the AP3923 spark plug is a good upgrade. It is an Autolite Platinum plug and comes in AP and APP -the later being double platinum and lasts longer. It is a slightly cooler plug and although the details regarding why we use this are long, we like to use this plug on performance motors and/or when replacement time comes.
Don't underestimate the value of having fresh and well performing spark plugs. For starting, acceleration and top speed - good plugs, produce good results. They are the heart of your engine.
This is usually not a concern for most customers, but we have received concerned calls.
Stainless steel propellers can discolor and form areas of light rust. Brushed finish stainless props are more susceptible than brightly finished stainless steel props. Rust stains can occur from polluted water, galvanic corrosion from the boat or marina, or from oxygen depletion. The propeller can be easily cleaned with stainless steel wool, rubbing compound or Scotchbrite. Regular steel wool will leave steel residue and cause more rust. After cleaning, use chrome polish to protect the finish. Stainless steel props can also turn white from calcium or lime in the water. In this case, clean the prop with household mineral bath and tile cleaner.. Follow-up with chrome polish to protect the finish.
If you have a screw on longtail or Hyper Drive propeller.
Mud motors are built to run on or near the bottom. As such, the propeller continually strikes objects. The propeller is screwed on the drive and each time it hits a rock or log it becomes tighter. So much so, that ordinary tools will not come close to removing the blade. Removing an over-tight propeller is actually very simple, all that is required is leverage. Mud Buddy sells a prop wrench set that includes extended length handles that will loosen the most stubborn prop. You can either get a set from Mud Buddy, or build your own.
Insert a pipe wrench or crescent wrench into a 2 to 3 foot length of tube to hold the rear propeller nut (closest to the bearing cap) . I like the crescent best. Drill or punch a 7/8" hole in a 2 to 3' length of 1 1/4" flat bar for a simple, but effective prop wrench.

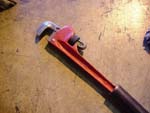
First remove the prop nuts and clean the threads with a wire brush. Coat with grease or oil. Place a pipe wrench of crescent wrench on the rear propeller nut, closest to the bearing cap. Place the prop wrench between the blades and arrange booth tools like a pair of large shears, one against your chest and pull the other towards you.

Pull the tools toward each other and the blade should loosen. The blade should then come off. If not add longer handles to the tools. Trust me, the blade is coming off our the shaft is ^$%#^%^%.
Once you have removed the propeller, clean the threads with a wire brush and coat with marine waterproof grease or anti-seize compound.
When installing a new propeller, if the prop is difficult to screw on, remove and clean the shaft and prop threads again.
Good huntin'.
What octane rating fuel should I use in my mud motor.
United States and Canada
Use a major brand of automotive unleaded gasoline with a minimum-posted octane rating of 87. Leaded gasoline is not recommended.
Our performance engines require 91 or higher octane.
Ethanol? Engine manufacturers are working on new Flexible Fuel Engines. Kohler has announced that all its engines will be converted by 2010.
Will the use of fuels containing ethanol void my engine warranty?
Fuels containing up to 10 percent ethanol are considered acceptable for use in our engines. Fuels containing higher levels of ethanol are not considered acceptable for use, and the use of fuels containing ethanol higher than 10 percent can void the warranty.
Does ethanol affect horsepower or fuel-efficiency?
Ethanol has a heating value of 76,000 BTU per gallon, which is approximately 30 percent less than gasoline's heating value (which is approximately 109,000 to 119,000 BTU/gal). The result is E-10 gasoline which should yield slightly lower mileage - a decrease of approximately 3 percent. Fuels containing higher levels of ethanol will have a corresponding reduction in mileage. For example, E85 fuels produce mileage approximately 30 percent less than gasoline.
The octane rating of pure ethanol (200 proof) is about 100 and is therefore useful in elevating the octane value of gasoline. In E-10 blends the presence of ethanol provides about 2.5 to 3 percent of the overall octane rating. The effect on engine horsepower is determined by the octane result of the blended fuel. Care should be taken to select fuels having the octane rating recommended for the engine your have.
What are ethanol and ethanol-blended fuels?
Ethanol for fuel is highly refined beverage (grain) alcohol, approximately 200 proof, that can be produced from natural products such as corn, sugar cane and wheat. New technology will allow ethanol to be made from "cellulosic" feedstocks including corn stalks, grain straw, paper, pulp, wood chips, municipal waste, switchgrass and other sources. Ethanol used for fuel has been "denatured," or rendered unsafe to drink by the addition of a hydrocarbon (usually gasoline). The ethanol-blended fuel E-10 refers to fuel that contains 10 percent ethanol and 90 percent gasoline. Similarly, E-85 refers to fuel that contains 85 percent ethanol and 15 percent gasoline. E-85 is intended only for engines specially designed to accept high-ethanol content fuel blends, such as the Flexible Fuel Vehicles (FFV) made by some car companies.
What are the characteristics of ethanol?
Ethanol is an oxygenated hydrocarbon compound that has a high octane rating and therefore is useful in increasing the octane level of unleaded gasoline. The EPA, the agency responsible for setting some of the requirements for all gasoline used in the U.S., has allowed the use of ethanol in gasoline at levels up to 10 percent as an octane enhancer and to provide beneficial clean-burning combustion characteristics that help improve some emissions.
Ethanol is hygroscopic (it has an attraction for water) and will more readily mix with water than with gasoline. It has different solvency behaviors than does gasoline, which allows it to loosen rust and debris that might lay undisturbed in fuel systems. And it can more readily remove plasticizers and resins from certain plastic materials that might not be affected by gasoline alone. Loose debris will plug filters and can interfere with engine operation. Additionally, ethanol is corrosive to some metals, especially in combination with water. Although gasoline does not conduct electricity well, ethanol has an appreciable capability to conduct electricity and therefore can promote galvanic corrosion. Basically guys, the choice is yours at this point.
My engine keeps stalling at idle, and or my engine cuts out at high speed.
Several basic items should be checked. First, is the fuel tank full of fuel and vent open?
Water in fuel or excessive amounts in water separator.
Your engine should idle between 1250 and 1450 for stock motors and 1000 to 1200 for Mikuni after market engines.
Second, is the fuel line pinched from a heavy object sitting on the line, or is a tight connection restricting flow?
Are there cracks in the line or connections, allowing air to leak into the fuel system?
If you located your fuel tank near the front of the boat, did you use a recommended 5/16” or 3/8” fuel line?
If you added a quick disconnect to the fuel tank, especially OMC type, you may be restricting fuel.
Do you have rope, weeds or wire wrapped around your propeller?
Is your fuel filter dirty or plugged.
Is your engine oil low?
Tip: If you use an in-line primer bulb, do not over pump the Mikuni carburetor after market engines. These carburetors have very small needle and seat valves and if you over-pump the bulb, you can push small particles of debris past the fuel filter element and into the needle and seat where it will plug the carburetor. This can stop the engine or restrict fuel during acceleration or at full throttle.
Also, the Mikuni carburetors have a low speed idle jet on the side of the carburetor. (brass screw). If your motor experiences hesitation at throttle-up, turn the screw in. The idle screw is normally set at 1 and a half turns out, but it can be run as far as all the way in. Each engine and carburetor are slightly different.
If you are in a state that is using 10% ethanol and you aren't using our fuel tank and new fuel lines, the ethanol can deteriorate the older system and cause particles to enter the fuel system, plug up fuel filter, etc.
What is the proper break-in procedure for our motors?
Break-in is important to ensure correct engine performance and life. Even though many of us have stated in the forum that you can run the engine at full throttle after five minutes, the official answer is to follow the procedure listed in the Engine Operation, Maintenance and Warranty Manual which usually states don't run at full throttle for the first 2 hours, then only briefly until 5 hours and always vary the throttle level during operation the first ten hours.
Generally, for the first two hours, we recommend avoiding extended idling, sustained periods of wide open throttle, or holding the engine at one speed for extended periods of time.
You can use regular automotive, synthetic or synthetic blend oil during break in. 10W30 is best.
I say use the best oil you can buy. It protects your engine, the engine runs faster and longer.
Use 87 or higher octane, 91 or higher for the performance engines.
Change your oil, lubricate all drive points and check the belt tension at 20 hours. This is the single most important thing you can do for your engine and drive.
I accidentally reversed the battery connections when I reinstalled the battery. What potential damage could I have caused?
Trim motor and bilge will operate backwards.
Engine may not start. On some models like the Kohler and certain Vanguard engines, even after you have corrected the problem, you may have burned out the ignition switch diodes located near the coils. A service center will be able to install new diodes. Check this by turning over the engine and observing the grounded spark plugs for spark.
You can damage the voltage regulator. Check the voltage regulator by connecting a voltage meter anywhere in the system, run the engine up to 2200 rpm or higher and the circuit should be 14 volts or more. If 12 or less, your system is not charging.
Check your rev limiter by slowly increasing the engine speed until it is near the rev limiter cut off point. If the engine speed exceeds the 4300, 4600 or 5100 rpm rev limiter maximum, the rev limiter has burned out. Replace the rev limiter immediately.
Other: If your battery has low power anytime, stock motors with carburetor fuel shut off valves may not start. The low voltage will not allow the fuel shut off valve in the carburetor to operate. If your engine does not start with a good battery, pour a little fuel in the carburetor. If the engine starts the fuel shut off valve may be damaged.
What should I do to prepare my mud motor for out-of-season storage or prolonged storage?
Clean the engine and drive of all foreign matter and mud.
The major consideration in preparing your mud motor for storage is to protect it from rust and corrosion. We recommend you read the storage information in your engine owner's manual. Damage from improper storage procedures is not covered under any of the engine manufacturers.
Change Oil: It is best to change the oil at the end of the season. Small amounts of acid from burning fuel builds up in the oil and when left during storage can cause corrosion that can lead to loss of engine power and engine failure.
What is the purpose of using Storage Seal in my engine?
Storage Seal Rust Inhibitor sold by many outboard marine stores is a blend of corrosion inhibiting additives designed to coat internal and external engine components during engine storage to reduce the formation of surface rust.
Use Storage Seal Rust Inhibitor as directed with the product. We basically, remove the spark plugs and spray the recommended amount in each cylinder, turn over the engine slowly and replace the plugs.
Fuel System care if very important. Mud Buddy recommends the use of a fuel stabilizer to prevent fresh fuel from undergoing degradation and oxidation during fuel storage. Additional benefits of the product includes: easier engine starting after periods of storage, elimination of the necessity to drain and dispose of fuel, prevention of the formation of deposits that could clog filters and tiny passages in the fuel system; and elimination of corrosion and rust throughout the fuel system. It also absorbs water and prevents fuel line freeze-ups. Fill the fuel tank to 90%, leaving room for hot weather expansion. Add stabilizer, and then run the engine up to five minutes to fill the fuel lines and carburetor with treated fuel. You can drain the fuel from all our Mikuni after market carburetors, but this isn't needed with fuel stabilizer.
If weather permits or you have a shop, this is a good time to check the belt tension and lubricate all serrates and the lower drive. Your belt tension should be 12 to 16 pounds at 1/4" deflection as described in your owner's manual.
We now recommend greasing the lower drive every 50 hours or at the end of the season. Remove the lower bleed screw from the drive (located near the belt housing), insert a 1/4 X 28 pitch thread zero into the drive and grease 12 pumps. Remove the zero and if grease oozes out, replace the upper drive bleeder screw. If not, add more grease.
The best method is to remove the propeller and bearing seal cap (right hand threaded) and pump grease into the drive until new grease comes out the bearing housing.
Wipe away excess grease and inspect the seals in the seal cap for foreign matter and fishing line. Replace the seals if needed by returning to Mud Buddy for a rebuild. The seals must be installed with special depth gauge tooling.
Newer models have a grease zero near the propeller. Remove the upper drive bleed screw and pump grease into the zero until it comes out the bleed screw hole. Again, the best method is to remove the lower bearing seal cap near the propeller.
Paint chips should be sanded lightly and re-finished to avoid corrosion.
Can I start my engine momentarily out of the water?
Yes, but be careful around others and pets, and do not engage the drive longer than five minutes.
Guys, as smart as our hunting dogs and children are, they will walk right into a blurred spinning propeller.
The patented Mud Buddy seal system uses a special configuration of seals that prevents the outer most seal from being lubricated other than when running in water.
If for some reason you need to run the drive longer than five minutes outside the water, remove the propeller and spray oil or silicone on the outer seal.
What precautions should I take when operating my engine in Salt Water or Polluted Water?
Mud motor engines are not designed to run in salt water, so we need to ensure these suggestions are followed if you run in this type environment.
We recommend that you flush the outside of the motor and drive every time you exit salt water. Run the engine at idle and slowly inject a water flow into the flywheel so that the mist will wash off the coils and wires under the engine cowl.
If you keep your boat moored in the water, always tilt the outboard so the gear case is completely out of the water (except in freezing temperature) when not in use.
Add an corrosion control anode to the boat side of the skeg. Any small configuration works.
Each month, spray Mercury Precision Lubricants or Quicksilver Marine Lubricants Corrosion Guard on external metal surfaces and on all exposed wire connections and harnesses. (DO NOT spray on corrosion control anodes as this will reduce the effectiveness of the anodes).
If you power-wash the mud motor, do not spray the high pressure into wire harnesses or near oil seal areas.
Paint chips should be sanded lightly and re-finished to avoid corrosion.
What precautions should I take when operating my engine in freezing temperatures?
Mooring and Hunting - When moored in freezing or near freezing temperature, keep the mud motor tilted down at all times so the lower outdrive is submerged. When you park your boat overnight and during hunting, park in a location where the waves are not splashing against the engine. This will cause severe ice build up on the outdrive and trim assembly. This can prevent your motor from turning and trim can freeze in position. If this happens, don't hammer the ice off the trim unit since this can break the wires and seal surfaces.
Belt Housing Leaks - Check your belt housing for water and condensation before freezing weather arrives by removing the small drain screw from the bottom of your belt housing. If there is more than a few teaspoons of water in the drive check for seal leaks. Tighten all the front and rear outdrive bolts. In some cases you can remove the clutch cover or vent inlet and fill the belt housing with water. You will then see the leak location. Seal threads and surfaces with an automotive sensor safe silicone (alcohol based available at auto parts stores). Do not use household window and door silicone sealer (they are ammonia based and will corrode the surfaces and wires).
Throttle Cable - If any water enters the throttle cable it will freeze and prevent you from running your motor. If you thaw out the cable with your hands or some other type of heat, I guarantee it will freeze when you are driving and you will have an unpleasant surprise. The throttle will stick and you will need to turn the key off or use the safety kill switch to stop. On short transom boats, the sudden stop will cause a wave to come over the transom. This is unsafe.
Prevent water from entering the cable by elevating both ends all the time. We elevate the engine side cable and you need to elevate the throttle end when you receive and install the handle on new motors. Use a tight wire tie 6" from handle to elevate the cable slightly.
Remove water in the throttle cable by removing the cable, hanging it vertically and insert WD-40 or silicone spray. The best way is to slide a tight fitting rubber hose over the throttle cable and spray silicone into a container and us the hose to funnel silicone into the throttle until it runs out the lower end. Now install the cable with both ends elevated.
Cover the throttle and handle controls with a plastic bag in freezing rain. The ice will build up and cause the switches to freeze in place. If you hammer the ice from the switches this can cause breakage. Carry a zip-lock, cover, or handle cover when in these freezing rain conditions.
Protect your fuel by removing ice and snow from your fuel tank. Shine a flashlight into the fuel tank at night and the little diamonds floating in the bottom of the fuel tank are water droplets. Don't allow ice and snow to enter the tank when refueling. Use moisture dissipating fuel additives in cold weather. One small ice particle in the tank, fuel line, filter or carb will make for a very short or long day on the water.
Carb Freezing can occur when running on mist or foggy water when temperatures fall below 35 degrees, not 32, 35 degrees. The accelerated damp air moving through the intake system will cause a sudden temperature drop and ice will build up in your carburetor. This will cause loss of power, exhaust smoking, accelerated fuel consumption and a headache. We make many models of engines and the Kohler, Kawasaki and large Vanguard have cold weather icing problems. On all these motors, turn the air filter intake towards the exhaust so warm air enters the motor. 
If your engine intake freezes, shut off the warm engine and cover with a motor cover, decoy bag, jacket or anything to keep the engine heat on the carburetor. It will thaw out in a 10 minutes.
Parking a boat on steep snow covered shorelines can be dangerous. Approach a snow covered bank slowly. The boat will power up the snow covered shoreline easily and when it slides back into the water, the transom can submerge. 
Snow and ice are the boat and motor's worst enemy. Cover your boat and motor when not in use. When the boat and motor become full of snow and ice builds up, it is necessary to garage the boat and completely thaw out all the components. Ice builds rapidly in the boat, adds weight and affects the stability and safe operations of the boat. Ice covered wires easily break. We have lots of fun when the weather gets very cold, but preventative maintenance is imperative.
What other things besides atmospheric conditions will affect my boat performance?
Proper positioning of the weight inside the boat (persons and gear) has a significant effect on the boat's performance, for example:
- Shifting weight to the rear (stern)
- Generally increases top speed.
- If in excess, can cause the boat to porpoise.
- Can make the bow bounce excessively in choppy water.
- Will increase the danger of the following - wave splashing into the boat when coming off plane.
- Shifting weight to the front (bow)
- Improves ease of planing off.
- Generally improves rough water ride.
- If excessive, can make the boat veer left and right (bow steer).
BOTTOM - For maximum speed, a boat bottom should be nearly a flat plane where it contacts the water and particularly straight and smooth in fore-and-aft direction.
- Hook: Exists when bottom is concave in fore-and-aft direction when viewed from the die. When boat is planing, 'hook' causes more lift on bottom near transom and allows bow to drop, thus greatly increasing wetted surface and reducing boat speed. 'Hook' frequently is caused by supporting boat too far ahead of transom while hauling on a trailer or during storage.
- Rocker: The reverse of hook and much less common. 'Rocker' exists if bottom is convex in fore-and-aft direction when viewed from the side, and boat has strong tendency to porpoise.
- Surface Roughness: Moss, barnacles, etc., on boat or corrosion of mud motor gear housing increase skin friction and cause speed loss. Clean surfaces when necessary.
WATER ABSORPTION - It is imperative that you not allow water to sit in your boat during the off season and in storage. Water intrusion into the transom core and/or inner hull will result in additional boat weight (reduced boat performance), hull decay and eventual corrosion and structural failure.
CAVITATION - Cavitation is caused by water vapor bubbles forming either from a sharp edge or angle on the gear case or from an irregularity in the propeller blade itself. These vapor bubbles flow back and collapse when striking the surface of the propeller blade resulting in the erosion of the propeller blade surface. If allowed to continue, eventual blade failure (breakage) will occur. Keep debris off the skeg. Hammer impact areas and breaks on the prop back into alignment. Do not grind these off which will reduce the prop diameter.
With the advent of after-market performance kits offered by BPS (Backwater Performance Systems) and the subsequent removal of the OEM governor control (HD 4000, HD 5000, HD6000 and HD7000), it has become necessary for us to install rev limiters on the engines.
Our rev limiters control top speed of the engine and come in a variety of sizes, 4300, 4600 and 5100 rpm. This is indicated on the yellow pill installed in your rev limiter. The 4600 rpm pill is new and we have released them in limited quantity only for engines with anti-floating valve spring spacers.
HD4000 engines released today must run the 4300 rpm pill in order to keep the valves from floating which in turn can damage the valve train.
Beginning in the spring of 2009 we will begin releasing the 4600 pill with all HD 4000 engines with our Iron Mountain performance heads that have the stronger valve springs and valve spring spacers. The new engine will be the HD4200. The new heads will allow the stock large block engine to rev to 4600 without floating the valves. The heads and higher RPM will produce more power.
The 5100 rpm pill is used on our HD5000, HD6000 and HD7000 engines with Mikuni carburetors. These engines have high RPM valve systems. The HD7000 has the Iron Mountain heads. HD5000 and HD 6000 engines will continue to have stock heads with improved valve springs for high rpm.
In the spring of 2009 we will also be releasing our new marinized rev limiters. These will be more water proof and have internal rev limiter RPM pills. We will mark the RPM limit on the outside of the rev limiter box.
Mounting: When we first released the engines with rev limiters, we mounted them on the engine. We later realized that some of the failures were caused by engine vibration. We now mount and recommend others that have them on the engines, mount them inside the boat near the engine in a dry location out of the way from bumping and impact damage. When extending the wires, use marine grade butt connectors to prevent corrosion.
Rev Limiter Failure: We have seen three types of failure.
1. The rev limiter is designed to revert to its fail-safe operation if any of the electronics fail in the limiter. Fail-safe turns the engine off.
2. The second type of failure is when the rev limiter changes suddenly from its peak rating to 2500 rpm. You will realize this happens when you suddenly can't put the boat on step without the engine missing and backfiring.
3. The third type of failure is very rare. The engine stops, will start back up and then stops again a few minutes later. This intermittent failure is the hardest to track.
Solution to Failure: Obviously the rev limiter needs to be replaced, however, if you are on the water, you need a quicker solution. So that you understand how the rev limiter works, lets spend a minute explaining it briefly and then tell you how to get the engine started in emergency situations.
The rev limiter has three wires, power, ground and a green RPM detector wire. The green wire is connected into a circuit that turns off the engine, one connected to the kill switch on the handle, one to the oil pressure safety sensor switch, one to the ignition off switch, and all are connected to the engine coils. In general, the entire circuit has an active alternating current (AC) pulse from the coils. If any one of the switches are activated and go to ground, the coils become grounded and turn off the engine. The AC current in the circuit is connected via the green wire to the rev limiter. Every time the engine rotates once, a pulse is introduced to the rev limiter and it monitors engine speed. When the engine hits the rev limiter limit (example 4300 rpm) the rev limiter circuit then temporarily grounds the coils and slows the engine. When the engine rpm drops below 4300 it has no affect.
So when the rev limiter fails and turns off your engine unexpectedly, just disconnect the green wire (we have provided a quick disconnect in the circuit near the rev limiter) from the rev limiter and your engine will run.
However, you will not have any high rpm protection so you must be careful to keep the propeller under the water and under load to prevent accidentally over-reving and subsequent engine damage. And, you will need to replace the rev limiter soonest. The rev limiter has a one year warranty.
Warning: The rev limiter is used to limit over-reving of the engine, it is not designed to control the speed of the engine. Meaning, you can occasionally bump up against the rev limiter when the prop leaves the water due to an impact, but if you have the wrong gearing, worn propeller, light load and boat, or additional modifications that add more power, you will run at the rev limiter rpm limit all the time and it will overheat and burn out.
The solution is to change gearing or replace the worn propeller causing the RPMs to drop. We make smaller lower gears for all our models that decrease RPM. These gears also harness that extra RPM and turn it into speed.
It is a known fact that weather conditions exert a profound effect on power output of internal combustion engines. Therefore, established horsepower ratings refer to the power that the engine will produce at its rated rpm under a specific combination of weather conditions.
Manufacturers internationally have settled on adoption of I.S.O. (International Standards Organization) engine test standards, as set forth in I.S.O. 3046 standardizing the computation of horsepower from data obtained on the dynamometer, correcting all values to the power that the engine will produce at sea level, at 30% relative humidity at 70 degum (20 Dodge) temperature and a barometric pressure of 29.61 inches of mercury.
Summer Conditions of high temperature, low barometric pressure and high humidity all combine to reduce the engine power. This, in turn, is reflected in decreased boat speeds--as much as 2 or 3 miles-per-hour (3 or 5 Km per-hour) in some cases. Nothing will regain this speed for the boater, but the coming of cool, dry weather.
In pointing out the practical consequences of weather effects, an engine--running on a hot, humid summer duma encounter a loss of as much as 14% of the horsepower it would produce on a dry, brisk spring or fall day. The same is realized when our motors run over 3000 feet elevation.
The horsepower, that any internal combustion engine produces, depends upon the density of the air that it consumes and, in turn, this density is dependent upon the temperature of the air, its barometric pressure and water vapor (or humidity) content, plus elevation.
Accompanying this weather-inspired and altitude loss of power is a second but more subtle loss. When designed, the engine was equipped with a propeller that allowed the engine to turn within its recommended rpm range at full throttle. With the coming of the summer weather and the consequent drop in available horsepower, this propeller will, in effect, become too large. Consequently, the engine operates at less than its recommended rpm.
Our motors and propellers run best in cool weather. Just so happens many of us are duck hunters and our loads increase during the fall and we need every bit of this power. Winter and spring generally produce the best weather for maximum power. Summer however, is different.
Most operators realize this and generally eliminate some of the load to regain lost power or live with it during warm weather. Others, strap on a slightly worn propeller with smaller diameter which in most cases increases RPM and boat speed.
Yes, go to www.backwaterperformance systems. com, also known as BPS. They sell aftermarket performance kits, heads, carb kits, rods, cams, valves, roller rockers, etc.

The Sport V and Boss drives have a neutral safety start switch located under the Sport V engine and under an access cover on the top of the transmission on the Boss Drive. If the switch is out of adjustment it will start in gear or may not start at all. See the owner's manual and adjust the safety switch. In an emergency, the owner's manual has procedures to bypass the switch. There are also emergency trim and shift procedures in the same section.
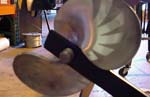
Your propeller is affected by wear. You will see decreased acceleration, poor hole shots, inability to carry a large load and your speed will decrease. Check your propeller by measuring the outside distance, diameter of the propeller. If you are running a 12 X 10 Big Blade for example, the 12 is the diameter and the 10 is the pitch or angle of the blade. If you measure the propeller and it has 1/4" or more decrease in diameter, then replace the blade.
The one most single thing you can do to prevent your motor from shaking to pieces, loose bolts, cracks and gasket leaks is to ensure your propeller is not worn, bent or out of balance. If so, replace it immediately. Check by reving the engine to full throttle in a safe manner. Observe the skeg and front of the engine. If it begins to vibrate excessively after 2500 rpm, and especially at 4300 rpm, change the propeller immediately.
Lubrication is important in a marine environment. Lack of it can cause premature wear and early machine failure. See your owner's manual for specifics. If you run in a salt or harsh environment, lubricate more often and remove any signs of corrosion. Lubricate the throttle cable at both ends with grease, to include the slide mechanism on the carburetor. Lubricate all swivel points, your drive with marine grease which you can purchase at any auto parts store. (marine wheel bearing grease is best). Lubricate the propeller threads or hex slip shaft with marine grease or never seize.
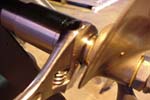
A rather common failure of the large block vanguard engine is the gasket area on the PTO cover (located on the back of the engine). This is caused from excessive vibration from a worn or out of balance propeller. Or even a bent drive shaft. Check the PTO cover bolts every 20 hours and retighten if necessary. Use 242 thread locker on loose bolts. Do not overtighten. If you have a major leak, change the gasket or see an Vanguard repair center for assistance. You have a three year warranty on stock motors, and 6 months on performance engines.
Yes, indeed. Performance mufflers like the Mud Buddy single crossover and Q mufflers have larger internal pipes and measured pipe lengths that increase exhaust flow. More
The Hammer propeller is a large horsepower mud motor blade that was developed for performance engines. It has a larger diameter, a bigger pitch, great hole shots, top end and is unbeatable in mud. It is also thicker and lasts longer than other propellers under similar use. More